Sunday 31 January 2016

Headlights & Indicators.

While I wait for the water pump to arrive I decided to get on with fitting the headlights and sidelights (now I have all the correct parts from S&J).


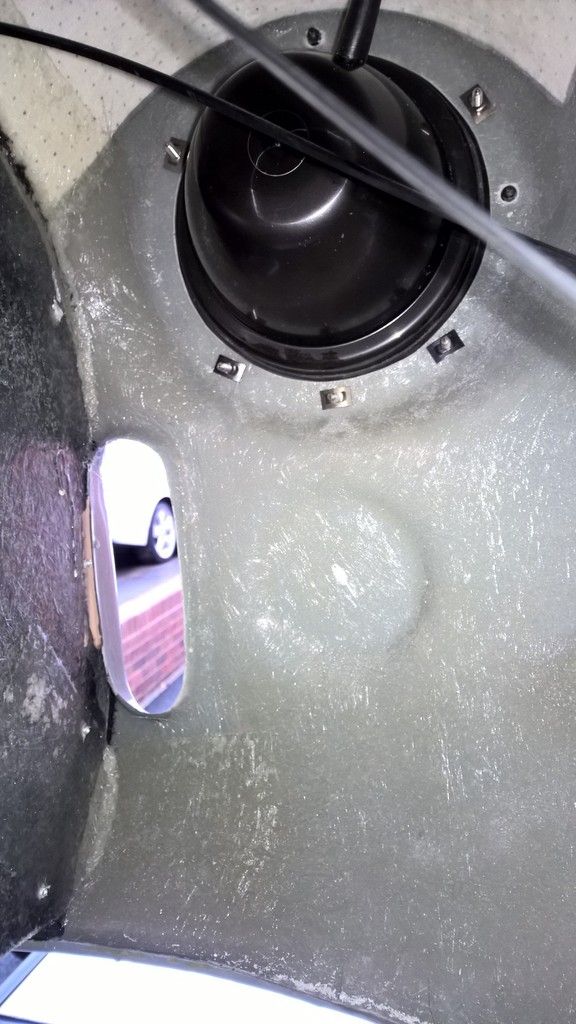
First make a template of the rubber seal on the headlights and drill the adjuster pin holes top and left. These need to be 8mm for the pins to fit through (start small and then open up the hole and don't forget safety mask as you're drilling fibre glass).

Remove the inner chrome mounting plate from the plastic bowl.

Next place the seal onto the plastic bowl and offer up into position. Drill at 3.5mm the fixing holes and then use No.10 self tapping 3/4" or 1" screws to fix it into position.

Push into place the small rubber grommet for the wiring to enter through inside the bowl. The wiring will be left for now and I'll come back to it when I do the main loom. 

Now attach the headlight to the inner chrome mounting plate, ensuring you have the correct orientation of the headlight so that when you put the mounting plate onto the bowl the headlight remains the correct way up. The headlight simply secures onto the mounting plate with three retaining clips. Loosening two of these and removing the third should be enough to fix in the light.

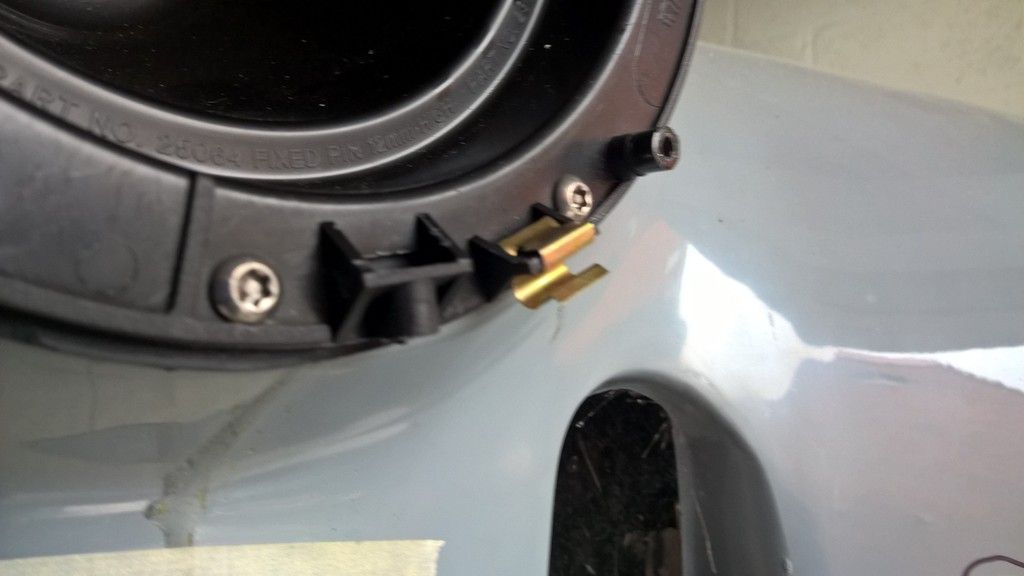
The mounting plate secures onto the bowl by hooking into place on the two adjuster pins and securing with the retaining screw.

Ensure you have a small retaining clip on the square flat plastic plate as shown in the picture. These were missing from mine when I received them and S&J had to send them separately.


Place the chrome outer ring into position ensuring it lines up with the retaining screw holes (just off centre bottom right) and that it is hooked over the two plastic rims top left and top right. Insert retaining screw.

NOTE: the other hole in the outer rim is a drain hole.

Onto the indicators.

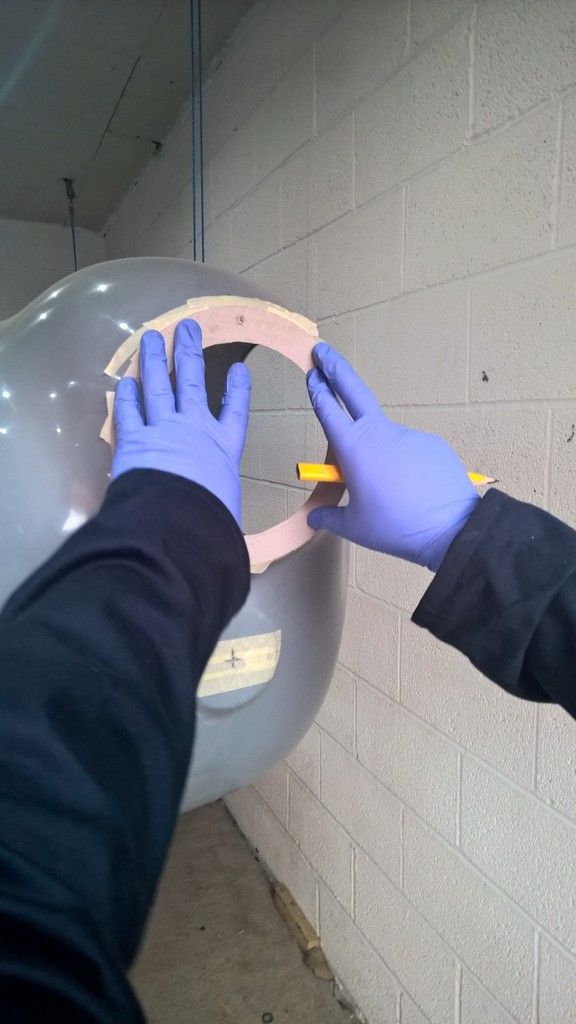
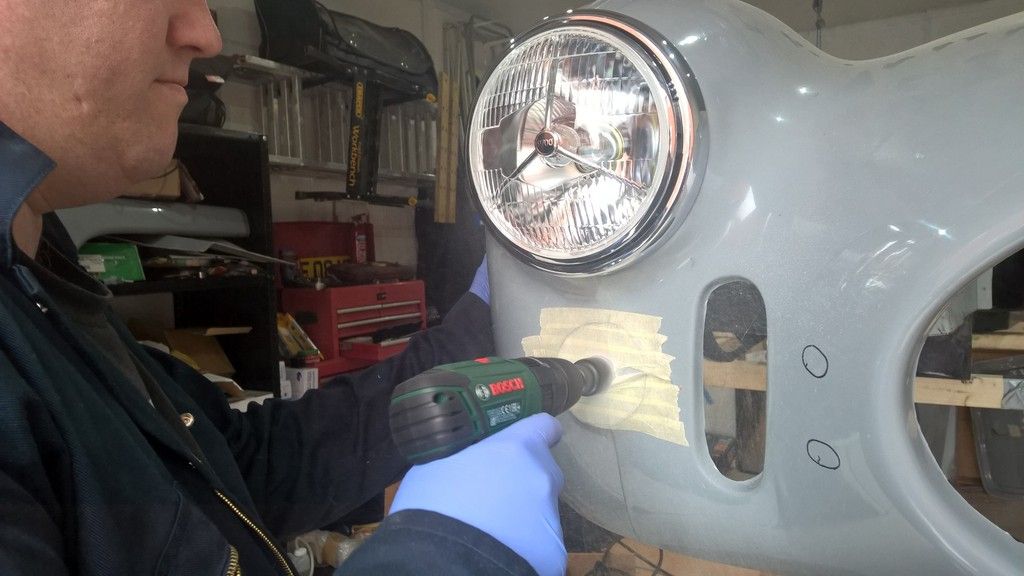
Locate the centre of the moulded area of the indicators. I measured this to be 4.25m radius.

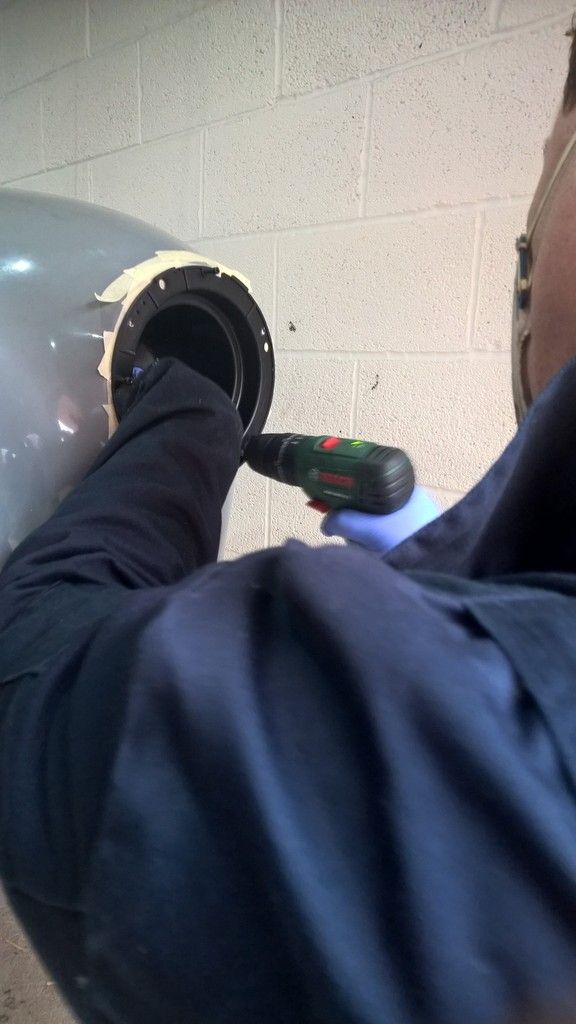
Drill a pilot hole at around 3-5mm and then use a circular cutter to open the hole wide enough to fit the light into position. 


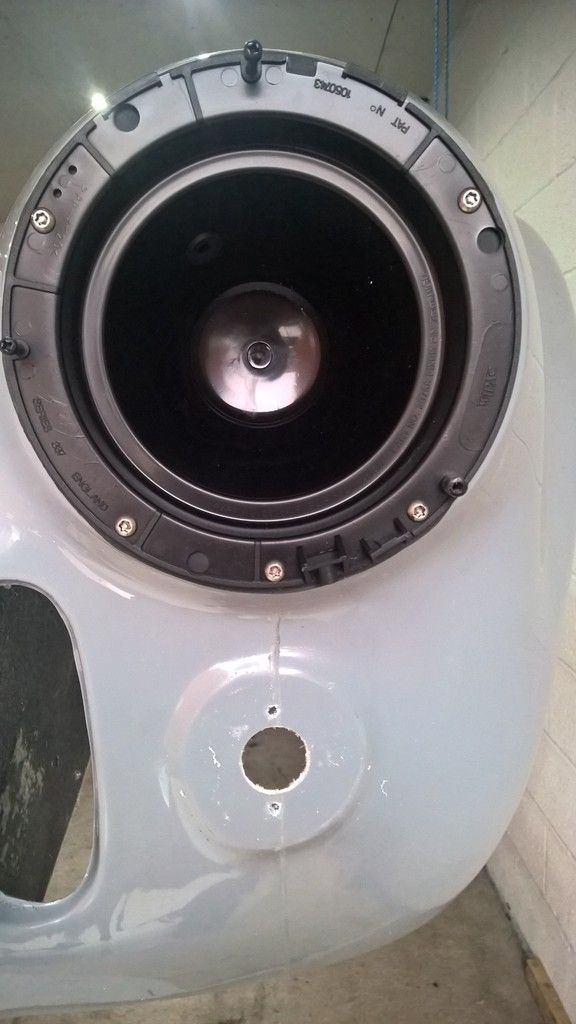
My lights attached with two 5mm bolts so an additional two holes were needed to  fit the light into position (other lights may vary). Simply place spring washers and bolts or a nyloc on the bolt to fix into position.


Then just repeat on the other side of the car.

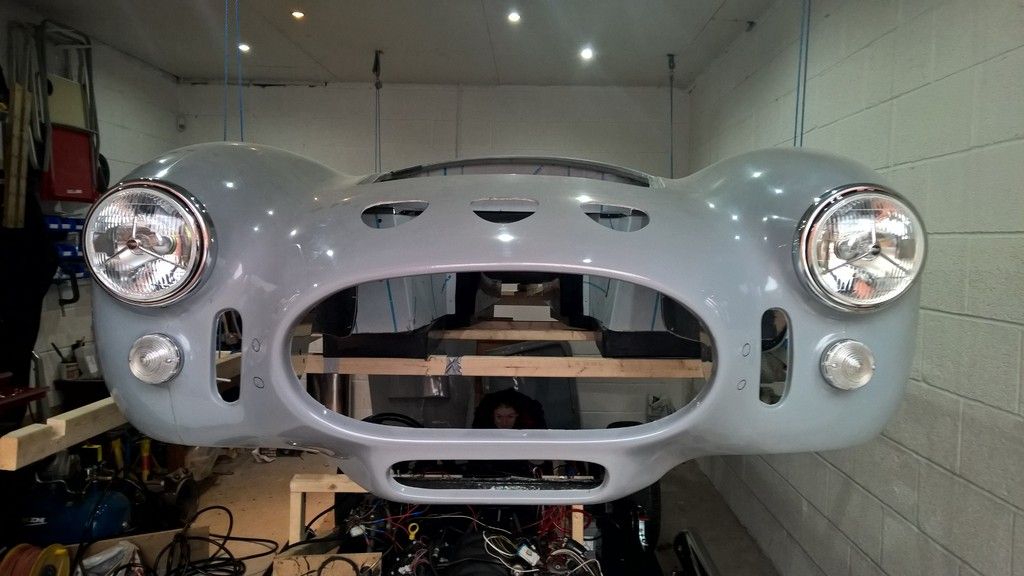
For the eagle eyed - you'll see me daughter who was helping "photo bombing" me. 

I'm pleased with the P700's and whilst I wait for the water pump I'll move onto the side repeaters next.


Water leak Update

Those that follow this blog regularly will know of the water leak from the recent posts.

Well, after waiting for the new gaskets to arrive, only to then have to order a new bolt I rebuilt it all and it leaked again!! 

Not straight away I'll add; it had to lure me into a false sense of security first. I ran it up to temperature and switched it off, let it cool for 20 minutes then ran it up to temperature again.

No problem.

The next day I went to do the same and within minutes it was leaking water. So another strip down required. 

I have traced the water flow and believe its coming from under the water pump pulley so a new pump is on order and it'll be 2-3 weeks before its here and the car can be run again.


Sunday 24 January 2016

Head meet brick wall!

The Mrs was heading out with friends this weekend so the plan was to achieve loads of little jobs on the car. You can probably tell it didn't quite work out that way!

The new water gaskets had arrived so the first job was to refit the water pump and build up the engine coolant system so I could run it again. As I was mounting it I noticed that one of the bolts was much shorter than the others and only about 3 threads were entering the block - probably the cause of my issue in the first place.

So after kicking myself for not noticing this in the first place I drove around all the diy shops locally to source another and they were all closed. By this time I was fairly annoyed so I ordered another bolt from ebay and moved onto the next job.

Next up was to fit the power steering lines now that I had good access with the radiator header tank being removed. This job actually went really well and I'm pleased with the result. After connecting the main pipe with two M6 rivnuts and bolts I decided to follow its lines with the return pipe and cable ties. 


Next up was to drill and tap the holes for the water bottle. Time for the next issue.

As you can see from below the washer bottle is fouling on the air intake pipe whereas I have 15mm clearance on the radiator header tank. I've emailed AK in the hopes they will modify it for me as a welder is one thing I don't have.


So then I decided to look at painting the wheel arches with isoflex rubber. Unfortunately the tin said it will dry within weeks once opened and I didnt have time to do the whole job so that was out the window until another day.

Onto fitting the front indicators...but my verniers battery had gone flat so I couldn't measure up!

This was all on top of last weeks fitting of the P700 which went well until fitting the outer ring. After a call to S&J it turns out they hadnt given me some clips I needed so they are now in the post on their way to me. 

Weekends like these test your patience on these builds, but I'm sure once I have the parts and fire it up again it'll soon put a smile back on my face.

Time to go get a Sunday roast dinner and forget about it until next time.

Thursday 14 January 2016

Oil Pressure Sender / Smiths Guages

When using the smiths flight gauges with the LS6 engine, the senders that are calibrated to the gauge are 1/8 NPT thread, which is significantly smaller than on the LS engine.

As a result I found myself taking parts off of another Cobra owners car at 10:30pm at night in order to do the first fire the next morning, but the fix is fairly simple.

carbuildersolutions sell all the parts required, which is essentially an M16 to 1/8 NPT adaptor and a 3 way 1/8 NPT T Piece (1 male, 2 female).

Why a 3 way?

Well, what the manual doesn't tell you is that the pressure sender gauge (or oil pressure transducer as smiths call it) does not operate the low oil pressure light, this requires a separate oil pressure switch. Luckily carbuildersolutions also do these.

Fitting is simple as the NPT threads just screw together and make a seal. The adapter on the block may need PTFE tape or thread seal (not thread lock) if it doesn't seal just upon tightening.

Here is a picture of the parts together (from left to right: M16 Adaptor, 1/8 NPT T-Piece, Oil Switch, Oil Transducer).


Friday 8 January 2016

ITS ALIVE!!

YES - THATS RIGHT - ITS ALIVE!!!!

And I am so happy with the sound and that fact that it started on first attempt. Here's a video of the attempt.


As with anything Cobra build related it didn't go exactly to plan.

The smith gauges come with 1/8NPT senders which require adaptors for the LS Engine. So Simon Smith came to the rescue and loaned my his adapter from his LS3 engine on his Cobra. (Thanks Mate)

After the first run of the engine it didn't want to restart; soon tracked down to a weak earth from the engine block so I can fix that no problem.

The bigger issue is that after a few runs I started to leak water from behind the water pump which suggests a failed gasket. This means a complete strip down of the coolant system again to fix the issue and of course £27 in delivery from the US for £6 worth of replacement gaskets.

But even with these issues, it simply cannot take away the sense of achievement so far; what a milestone!

Onwards and upwards the build goes :-)

Monday 4 January 2016

Prep for first fire

Well were through Christmas already folks and it has been good to have some downtime with the family, despite spending most of it with the man flu. The kids enjoyed Christmas day and the Mrs made my day by getting me a few Cobra parts including a stainless washer tank, exhaust escutcheons and stainless side vents. It's always good at Christmas but I don't think I've been that happy with my presents since being a kid.

As I thought about the next job on the build my biggest concern became knowing everything mechanically worked before fitting the body so I decided to build up a test rig that would get me to the point.


First job was to fit the Canems ECU, mainly because one of the sensor connections goes behind the starter motor. Finding the sensor locations was more difficult than I thought; being a first time builder its not immediately obvious where everything goes. I obtained the wiring diagram from Dave at Canems and then tracked down the images to the left and right on the net which helped to identify where to connect the ECU. I make it sound easy but actually this took a few attempts to get everything where it was supposed to be. 

The Canems ECU is very well made, with all the connectors plugging straight onto existing sensors. Canems can also provide the modified fly by wire pedal (which AK can incorporate onto their pedal box) and the air temp sensor (which is a standard GM resistance curve sensor on the LS).

Once the ECU was connected to the block I could fit the starter motor. A fairly straightforward job of putting in two bolts.

Next - onto some fabrication out of bits of wood I had around the garage. I wanted to create a panel to attach the clutch, brake servo and pedal box onto as well as a full scuttle hoop to be able to attach the steering column to. This job is very easy to do with a few angle brackets, 7-10mm drill bits and a few drill mounted hole saws (the same as you would use for the indicators). Some parts of the job require a couple of people and/or G-clamps to hold bits in place whilst its screwed together but in just a few hours you can have it put together.

To keep things simple I decided to ditch the AK loom for the test and create just the wires I needed to as troubleshooting would be much simpler if I knew what every wire did. 


First was the positive battery wire to the start motor, second the negative to the cut off switch which I then earthed to the passenger side chassis rail.

Then I had to figure out what wires on the BMW stalk were the ignition. Simply put its:
  • Thick Red - positive input from starter motor
  • Thick Green - First ignition click power out
  • Thick Purple - Second ignition click power out (connected to fuel pump relay for the test)
  • Black/Yellow - Momentary start power out (connected to small input on starter solenoid for the test
Next up was to fit a spacer that davidg from the cobra forum had made for me as the drive belt was going to foul on the thermostat housing. It required some M6 x 55mm flange bolts which I had ordered earlier in the week. 

Luckily I had another O ring from the previous thermostat to ensure it all sealed properly but if you didn't have that I am sure any water gasket sealant would work.

The workmanship from david was perfect and after filling with coolant not a single leak.

Last two jobs - power steering and fuel delivery.

The power steering hoses were purchased through Earls the same as my custom clutch hose. They were great costing £120, both 1m long including all the joints I needed:

  • M14 pressurised input on BMW rack
  • M16 for return on BMW rack
  • Open hose with jubilee for power steering return
  • 5/8ths power steering adapter for pump
The clearance on the power steering pump wasn't an issue, but I did have to install the pump after connecting the hose so I could ensure it was tight. 


Finally I put 5 litres of fuel into the tank and ran off a litre into a bowl to clear any crud out. Then I filled the pump with fuel to prime it (obviously removing hoses and reconnecting as necessary). Wiring the fuel pump was a simple case of:

  • a 30amp relay running positive from the battery to the pump.
  • a negative running from pump to earth
  • a negative running from relay to earth
  • a 12v positive running from ignition position 2 to relay. 
Turning the ignition key then set the pump flowing which I allowed to run for a few minutes to ensure all items would take the pressure, that there wasnt any leakage and that the return valve was sending excess fuel back to the tank. 

A quick connect and bleed of clutch and brakes and.....

Everything was good so all in all I was pretty chuffed with myself. :-) 

After filling the power steering fluid (I used Dexron III ATF/PS Fluid) I turned the key for the first time to start to ensure the starter motor would engage and again all good. A clean sheet of tests passed with no leakage or re-work required.

I have just the fan to connect to the Canems ECU and the oil pressure gauge to connect which I ordered today from Digital Speedos. Dave from Canems is booked for Friday 8th Jan to come to my home and help me start her up for the first time and properly map the ECU now that I have lamda sensors (previously only mapped on the dyno).

So watch this space readers - I expect to post a video of the engine running this weekend - a major milestone if I achieve it.